
I was trying to calculate the amount I've knitted since Christmas - and I've managed to scare myself!
I seem to have knitted over 13,500 metres of yarn since Christmas !
5 scarves
1 pair fingerless mitts
1 beret
2 adult coats
2 child cardigans (approx 10yr old size)
1 adult vest
2 child vests (approx 10yr old size)
1 child jumper (10yr old)
1 massive shawl
1 dolly jacket
Most of that knitting was for the stage and so I was developing the patterns as I went. Still have a couple of items to make with deadlines that are galloping to meet me - so click clicketty click ...
Thursday, 24 March 2011

Tuesday, 15 March 2011
Musing about Distressed Knitting: part 1
First there was a fad for 'distressed' furniture - and when we renovated our kitchen the cabinet-maker was convinced that I would want cupboards made of new timber specially bashed about to make it look old & recycled (ridiculous - I told him that I did NOT want distressed cupboards or a stove on the verge of a mental breakdown and if anything was going to be distressed in my kitchen it would be me !) ... Then we had 'distressed' jeans and I sincerely hope that fad is on the decline. But best not get me started on that soap-box because really, I wanted to talk about Distressed Knitting.
 Because, I've been doing a lot of it lately - costume for stage productions. Many costumes get 'broken down' - when a character is poor, or is in the middle of a big adventure / war / is fleeing from a monster ... it would be rather strange if they looked like a fashion plate in beautiful, brand new clothes. When a costume is sewn specifically for a production it is made beautifully and then handed to the 'art finisher' who, depending on the look desired, sprays or paints dye into it (for sweat, blood, dirt ...) chops into it with scissors & things, scruffs if up with graters, wire brushes etc etc ... all of which sometimes causes the costume makers to join the costumes in being distressed!
 Some Very Distressed & emotionally disturbed sewing.
With hand-knitting some dyeing processes are OK but you cannot chop into knitting or attack it with wire brushes - unless you go to a lot of trouble stitching around the area first ... which is done, mostly with shop-bought machine knitted garments, but it is not really satisfactory and is rather obvious - at least to all the knitters in the audience :-)
So, when a costume designer wants hand-knitting to look old and tatty it is done as the item is knitted. Sounds easy enough but you need the garments to be stable - those holes & ladders should be the same for the 101st performance as they were on opening night - and the tattyness should be visible to people sitting up the back.
The first piece of Distressed Knitting I made was a shawl for the Bird Lady in Mary Poppins the musical - soon to open in Sydney (I blogged about the shawl here) and here is Debra Byrne wearing it.
 The designer wanted that shawl to resemble one made from machine knit fabric that had been extremely laddered.
The more recent Distressed Knits are all for Opera Australia's new production of La Boheme - designs by the wonderful Julie Lynch (BTW if you go to "folio" there you'll see, amongst all those fabulous costumes, some other knittings that I've made for the stage - in 'Little Women' including the red & black bonnet :-) and the black & silver cardigan in 'Mary Stuart') The major characters in La Bo are impoverished artists and students and this new production is set in 1930's Berlin.
As this post is getting quite lengthy I'll just talk about the scarves and keep the other knittings for part 2. I've knitted 7 scarves, all bar one (for the LandLord so he has money!) have varying degrees of Distress. These are not very distressed - merely sobbing gently in the corner -
 a wide scarf - more about the stripes and slipped stitch rib pattern than the tattyness. Those colours make me think of chocolate cake with cream :->
 This one is long - and mostly about the contrast 'splodges' which make it look dirty & stained.
These 2 are on medication ... (but aren't the colours fabulous - the yarns were chosen by Julie Lynch. The red is for an artist, the other is for the Plum Seller - perfect colours!)


And these are for street urchins and they are extremely distressed, poor things.


Well, that last one didn't get many holes etc - the mottled thick&thin yarn looked like it was in a bad way all by itself and my added tattyness was mostly wasted.
Now a scarf is merely an accessory - hard for me (as the knitter of them) to keep that perspective but the performers will be wearing more than just the scarves (I hope!) However, as all scarf wearers know, a scarf can say a lot and of course I wanted to do the best job possible and deliver what Julie Lynch required ... SO quite a lot of thought & planning went into those apparently simple bits of knitting:
 Because, I've been doing a lot of it lately - costume for stage productions. Many costumes get 'broken down' - when a character is poor, or is in the middle of a big adventure / war / is fleeing from a monster ... it would be rather strange if they looked like a fashion plate in beautiful, brand new clothes. When a costume is sewn specifically for a production it is made beautifully and then handed to the 'art finisher' who, depending on the look desired, sprays or paints dye into it (for sweat, blood, dirt ...) chops into it with scissors & things, scruffs if up with graters, wire brushes etc etc ... all of which sometimes causes the costume makers to join the costumes in being distressed!
 Some Very Distressed & emotionally disturbed sewing.
With hand-knitting some dyeing processes are OK but you cannot chop into knitting or attack it with wire brushes - unless you go to a lot of trouble stitching around the area first ... which is done, mostly with shop-bought machine knitted garments, but it is not really satisfactory and is rather obvious - at least to all the knitters in the audience :-)
So, when a costume designer wants hand-knitting to look old and tatty it is done as the item is knitted. Sounds easy enough but you need the garments to be stable - those holes & ladders should be the same for the 101st performance as they were on opening night - and the tattyness should be visible to people sitting up the back.
The first piece of Distressed Knitting I made was a shawl for the Bird Lady in Mary Poppins the musical - soon to open in Sydney (I blogged about the shawl here) and here is Debra Byrne wearing it.
 The designer wanted that shawl to resemble one made from machine knit fabric that had been extremely laddered.
The more recent Distressed Knits are all for Opera Australia's new production of La Boheme - designs by the wonderful Julie Lynch (BTW if you go to "folio" there you'll see, amongst all those fabulous costumes, some other knittings that I've made for the stage - in 'Little Women' including the red & black bonnet :-) and the black & silver cardigan in 'Mary Stuart') The major characters in La Bo are impoverished artists and students and this new production is set in 1930's Berlin.
As this post is getting quite lengthy I'll just talk about the scarves and keep the other knittings for part 2. I've knitted 7 scarves, all bar one (for the LandLord so he has money!) have varying degrees of Distress. These are not very distressed - merely sobbing gently in the corner -
 a wide scarf - more about the stripes and slipped stitch rib pattern than the tattyness. Those colours make me think of chocolate cake with cream :->
 This one is long - and mostly about the contrast 'splodges' which make it look dirty & stained.
These 2 are on medication ... (but aren't the colours fabulous - the yarns were chosen by Julie Lynch. The red is for an artist, the other is for the Plum Seller - perfect colours!)


And these are for street urchins and they are extremely distressed, poor things.


Well, that last one didn't get many holes etc - the mottled thick&thin yarn looked like it was in a bad way all by itself and my added tattyness was mostly wasted.
Now a scarf is merely an accessory - hard for me (as the knitter of them) to keep that perspective but the performers will be wearing more than just the scarves (I hope!) However, as all scarf wearers know, a scarf can say a lot and of course I wanted to do the best job possible and deliver what Julie Lynch required ... SO quite a lot of thought & planning went into those apparently simple bits of knitting:
- With the tight time-scale and the need for 'squishyness' I decided to use larger-than-normal needles for loose and (relatively) quick knits
- The yarns were chosen by Julie Lynch and were mostly quite chunky but some were much thinner - in most cases I used the thin ones held double
- All except the "choc cake & cream" scarf are completely reversible - various forms of ribbing and 'blanket' or 'basket' stitch. With the choc&cream scarf Julie needed me to reproduce the stripe pattern from a photo of a vintage scarf
- Most of these scarves have stripes - the cutting and joining of new yarn is usually a problem as all the ends have to be secured and sewn in invisibly. With these distressed knits the ends are all secured but the sewing is not always invisible, however, most are. If I'd left all the tails sticking out these scarves would've looked like hairy caterpillars
- The splodged scarf was the most difficult. The white yarn is thick soft alpaca, the beige yarn is an extreme thick&thin, the dark yarn is thinner and tightly spun - how to achieve the look Julie needed with the right percentages of those yarns and not have an unmanageable amount of joining&ends?


- A ladder often starts from a hole and doesn't always go all the way to the edge
- Holes are seldom perfectly symmetrical
- Knitting often gets caught on things which results in a pulled thread
- If knitting gets unravelled there will be loose yarn
- If a scarf were caught in a door or a machine (being very imaginative here!) and it was torn on the fringed end ... well the fringe would be torn and missing there too.


Thursday, 10 March 2011
A Moth of Letters
Yesterday this very learned and well-read insect paid us a visit.

I have no idea what her proper Latin name is but I'm sure it starts with Prof. She certainly has a lovely funny moth-face with fine and elegant antennea. Quite small - about 1.8cm long.

After the photo session I took Prof. Moth out to the garden and encouraged her onto some wood which was more suited to her lovely camouflage outfit than our vintage letter-holder.

I have no idea what her proper Latin name is but I'm sure it starts with Prof. She certainly has a lovely funny moth-face with fine and elegant antennea. Quite small - about 1.8cm long.

After the photo session I took Prof. Moth out to the garden and encouraged her onto some wood which was more suited to her lovely camouflage outfit than our vintage letter-holder.
Sunday, 27 February 2011
Is there a Dr Zhivago in the house?
I don't like to boast about the commissioned knitting I do for theatrical productions until they've 'hit the stage' but Dr Zhivago's opening night was over a week now so I guess it's ok to show-off now :-) Especially as I'm actually listed in the back of the programme - in the credits - as 'Knitter' hilarious!
The Costume Design by Tess Negroponte got very good reviews - there are some really pretty evening gowns in the 1st act :-) all my knitting was for the 2nd act, after the revolution. First I knitted a coat for 'Lara' ... unfortunately they didn't use this coat but I love the 19teens styling - fitted, long-line with shaped hem-line.

Tess wanted a Tweed yarn and we couldn't find one in the right colour so we bought (from Bendigo Woollen Mills) some blue 8 ply (DK in the US) and white lace weight, I dyed the white a light grey and then plyed the yarns together on my spinning wheel. Tess also wanted a striped look with some "lobster claw" cables - I chose to use a rib with a slipped stitch for the other stripes (that slipped stitch made the 'stripes' stand out a bit better). Here is some detail Moss / Seed Stitch borders, shaping increases / decreases placed between the 'stripes' ....

and Short Rows to shape the hem ...

When I knit for the stage I can't use an existing pattern (is there a pattern for a coat like this ??) I'm usually given a toile or paper pattern which has been fitted to the performer (the wonderful costume maker Tony Phillips did the toiles for the knits; he and his company made most of the women's costumes for Dr Zhivago). Careful swatching, gauge measurements and lots of maths follow ...

Next I made a beret for 'Tonia' - also not used. Although I made it quite large, I guess it wasn't big enough to go over all Tonia's hair & wig. This was based on an existing pattern - Woolly Wormhead's 'Meret' . Modeled by Linda the Plaster Person who has no eyes!
 Next off the needles was an old-fashioned vest for 'Alex' (Dr Z's father-in-law, played quite marvelously by Peter Cousins) And this vest gets some really good 'stage-time' :-) Front with a cable stitch texture and 3 working pockets - again Moss Stitch borders this time with crochet contrast on the edges - all Bendigo Woollen Mills yarns.

The back is plain stocking stitch. I'm showing the knits with pins - they did get buttons but someone else put them on.


Then, right at the last minute they asked me to knit a shawl ... 1.5m square in less than a week EEP!
The reference was a photo of a classic baby shawl with stocking stitch centre and wide lace border with geometric, diamond pattern. There was no way I could hand-knit it in the classic lace-weight yarn given the time frame - I used 8ply but was still knitting 14hrs a day ... and we had a heat-wave (talcum powder helped to stop the sticky factor!)
I did it - knitted in 4.5 days with lace border and edging that I charted out myself For the border I borrowed elements from the Faux Russian Stole in “A Gathering of Lace” the Faux Russian seemed appropriate :-) and the edging was loosely based on the edging in Wendy Engstrom’s ”Orenburg Style Shawl” {a Ravelry link} The Edging seemed to take forever and used up so much yarn. Edgings are deceptive - they look small but they go on and on and on ...
As soon as it was knitted it went into the dye pot - for a slightly darker grey (though it still looks quite light in the photos). Luckily the drying after the dying could be combined with blocking - though when I delivered the shawl the next day it was still slightly damp!

The shawl is used but is not on stage for long - 'Lara' wears it when she & the good Doctor come downstairs during the song Love Finds You - I think that was the song. I saw a Preview and when she ran back upstairs the lace flounced quite nicely - It's all about the flounce but a good flounce counts for a lot in the heart of a costume maker :-)
And here is another photo - that lace did seem to go on for ever.
The Costume Design by Tess Negroponte got very good reviews - there are some really pretty evening gowns in the 1st act :-) all my knitting was for the 2nd act, after the revolution. First I knitted a coat for 'Lara' ... unfortunately they didn't use this coat but I love the 19teens styling - fitted, long-line with shaped hem-line.

Tess wanted a Tweed yarn and we couldn't find one in the right colour so we bought (from Bendigo Woollen Mills) some blue 8 ply (DK in the US) and white lace weight, I dyed the white a light grey and then plyed the yarns together on my spinning wheel.
 Tess also wanted a striped look with some "lobster claw" cables - I chose to use a rib with a slipped stitch for the other stripes (that slipped stitch made the 'stripes' stand out a bit better). Here is some detail Moss / Seed Stitch borders, shaping increases / decreases placed between the 'stripes' ....
and Short Rows to shape the hem ...

When I knit for the stage I can't use an existing pattern (is there a pattern for a coat like this ??) I'm usually given a toile or paper pattern which has been fitted to the performer (the wonderful costume maker Tony Phillips did the toiles for the knits; he and his company made most of the women's costumes for Dr Zhivago). Careful swatching, gauge measurements and lots of maths follow ...

Next I made a beret for 'Tonia' - also not used. Although I made it quite large, I guess it wasn't big enough to go over all Tonia's hair & wig. This was based on an existing pattern - Woolly Wormhead's 'Meret' . Modeled by Linda the Plaster Person who has no eyes!
 Next off the needles was an old-fashioned vest for 'Alex' (Dr Z's father-in-law, played quite marvelously by Peter Cousins) And this vest gets some really good 'stage-time' :-) Front with a cable stitch texture and 3 working pockets - again Moss Stitch borders this time with crochet contrast on the edges - all Bendigo Woollen Mills yarns.
The back is plain stocking stitch. I'm showing the knits with pins - they did get buttons but someone else put them on.


Then, right at the last minute they asked me to knit a shawl ... 1.5m square in less than a week EEP!
The reference was a photo of a classic baby shawl with stocking stitch centre and wide lace border with geometric, diamond pattern. There was no way I could hand-knit it in the classic lace-weight yarn given the time frame - I used 8ply but was still knitting 14hrs a day ... and we had a heat-wave (talcum powder helped to stop the sticky factor!)
I did it - knitted in 4.5 days with lace border and edging that I charted out myself
 For the border I borrowed elements from the Faux Russian Stole in “A Gathering of Lace” the Faux Russian seemed appropriate :-) and the edging was loosely based on the edging in Wendy Engstrom’s ”Orenburg Style Shawl” {a Ravelry link} The Edging seemed to take forever and used up so much yarn. Edgings are deceptive - they look small but they go on and on and on ...
As soon as it was knitted it went into the dye pot - for a slightly darker grey (though it still looks quite light in the photos). Luckily the drying after the dying could be combined with blocking - though when I delivered the shawl the next day it was still slightly damp!

The shawl is used but is not on stage for long - 'Lara' wears it when she & the good Doctor come downstairs during the song Love Finds You - I think that was the song. I saw a Preview and when she ran back upstairs the lace flounced quite nicely - It's all about the flounce but a good flounce counts for a lot in the heart of a costume maker :-)
And here is another photo - that lace did seem to go on for ever.

Monday, 21 February 2011
The Jet Set
The dolls are going on an overseas holiday for the first time this year and they are terribly excited. They will be going to France (naturally) so Audrey has been reading a biography of Madame de Pompadour, whereas Lillian has been reading Maigret novels and studying French ... Je suis une poupée .... Deux botttles de ce parfum ....
They are both convinced that it will be really cold and I've had to knit Audrey a new coat ...
 A slight adaptation of the "NxtDrGrrl Hoodie" (longer and with a neck tie) in "Jitterbug" sock yarn.
This morning their passports arrived - causing Much Excitement -

They are really Very Small and it seems that the country of Blythia is in Florence !? The dolls were very pleased that they could choose the colour of their passports ...
 Unusually, the photos are quite nice !! In the description, under "Eyes" both dolls have 4 colours listed :-)
 Lillian had to check that her velvet coat and hat still fitted her ! Honestly, they really are quite twitterpated!
They are both convinced that it will be really cold and I've had to knit Audrey a new coat ...
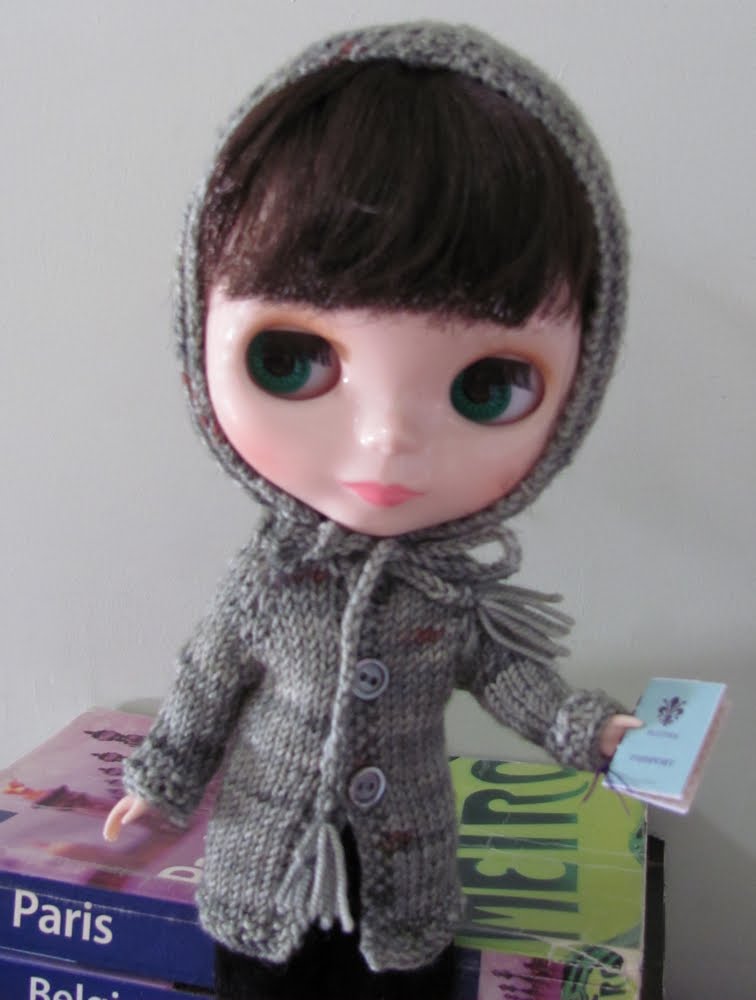 A slight adaptation of the "NxtDrGrrl Hoodie" (longer and with a neck tie) in "Jitterbug" sock yarn.
This morning their passports arrived - causing Much Excitement -

They are really Very Small and it seems that the country of Blythia is in Florence !? The dolls were very pleased that they could choose the colour of their passports ...

 Unusually, the photos are quite nice !! In the description, under "Eyes" both dolls have 4 colours listed :-)
 Lillian had to check that her velvet coat and hat still fitted her ! Honestly, they really are quite twitterpated!
Tuesday, 15 February 2011
Paws Button
erk erk ... can't resist a silly pun. Well, work on the dog costume continues sporadically - some time ago I showed you the front paws and now for the hind feet. Once again cartoon-like but not too large.
I started with the toes ...
Using methods learnt at TAFE when making the shoes for a 'Munchkin' Costume - it can be seen here. PE foam is wonderful stuff and this was just thin enough to cut with scissors :-) A basic layering for the rough shape. That black object is one of the canvas shoes that these paws are going to be built unto. Glued those layers together ... erg - contact adhesive is so ... snot-like! Then lots of sanding back & a bit of wadding to refine the shape, put vinyl on the sole & fur on the top and suddenly it looks a bit like a paw. This is pre- glue & stitch as you can see by the pins sticking out!
 The fur is mostly glued with some stitches in strategic spots. Had trouble achieving "toe cleavage" the valleys between the toes which are important to achieve a cute paw. Had to stitch right through the thickest parts of the paws and nearly lost my needle a few times! Here is the 'sole' and you can see those stitches - and how the toe will fit round the shoe (once sewn together, they fitted more snugly).
 Here is the pair of toes ...
 Stitched the toes to the canvas shoes and made furry tops to cover the remaining parts of the shoes and the wearer's ankles - he will have fur legs which are rather like track-pants. I'm not sure if the tops of these paws (now looking rather like ugg boots!) will be tucked inside the fur trackie-daks or go outside. Opted for an elastic loop and button system round the ankles for flexibility of wearing while minimising trip hazards.

Had to try the paws on - there is something about big furry feet that makes you want to giggle!

I started with the toes ...
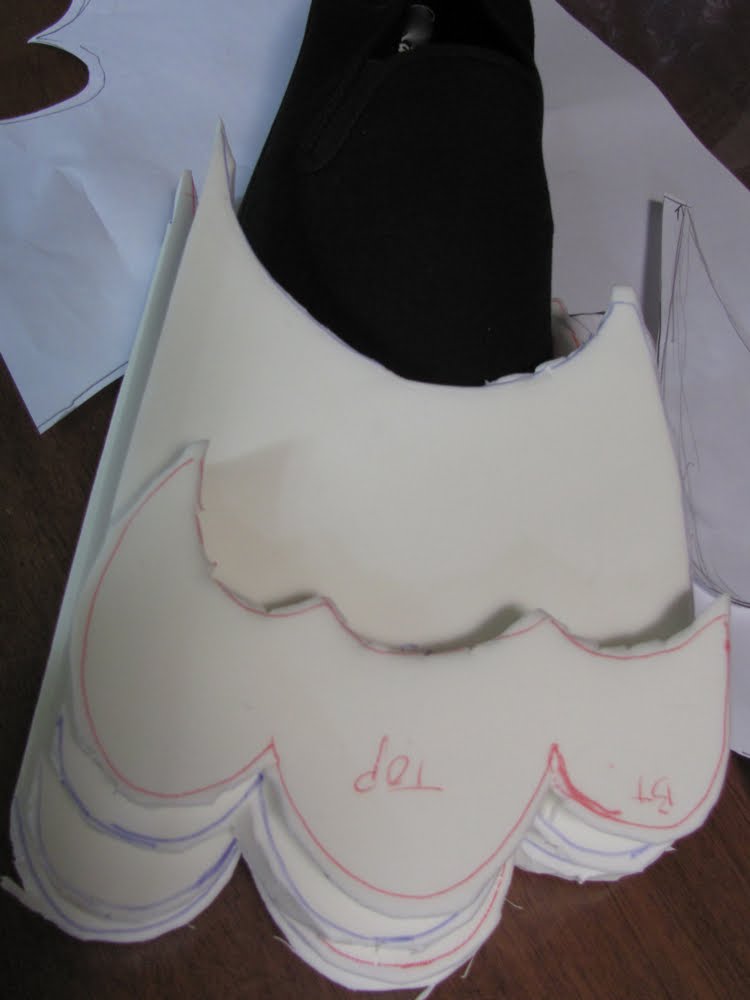
Using methods learnt at TAFE when making the shoes for a 'Munchkin' Costume - it can be seen here. PE foam is wonderful stuff and this was just thin enough to cut with scissors :-) A basic layering for the rough shape. That black object is one of the canvas shoes that these paws are going to be built unto. Glued those layers together ... erg - contact adhesive is so ... snot-like!
 Then lots of sanding back & a bit of wadding to refine the shape, put vinyl on the sole & fur on the top and suddenly it looks a bit like a paw. This is pre- glue & stitch as you can see by the pins sticking out!
 The fur is mostly glued with some stitches in strategic spots. Had trouble achieving "toe cleavage" the valleys between the toes which are important to achieve a cute paw. Had to stitch right through the thickest parts of the paws and nearly lost my needle a few times! Here is the 'sole' and you can see those stitches - and how the toe will fit round the shoe (once sewn together, they fitted more snugly).
 Here is the pair of toes ...
 Stitched the toes to the canvas shoes and made furry tops to cover the remaining parts of the shoes and the wearer's ankles - he will have fur legs which are rather like track-pants. I'm not sure if the tops of these paws (now looking rather like ugg boots!) will be tucked inside the fur trackie-daks or go outside. Opted for an elastic loop and button system round the ankles for flexibility of wearing while minimising trip hazards.
Had to try the paws on - there is something about big furry feet that makes you want to giggle!

Sunday, 13 February 2011
A Flying Dragon in my Garden
Late summer / early autumn is the time for dragons and damsels, no, I'm not talking fairytales, I'm talking about Odonata - dragonflies and damselflies.
This magnificent dragonfly was in our garden last week.
 I have no idea what sort of dragonfly he or she is, have tried to identify but ended up completely confused. Eyes and thorax were dark, nice yellow 'racing stripes' on thorax. Very bright blue spots on the back were the wings attach ...
 that part of a dragonfly looks so ... mechanical and exposed somehow, like the engine is showing. I've always thought of dragonflies as being rather like helicopters and after I had taken loads of photos this one took off just like a mini-helicopter - vertical and with a really neat spiral.
This magnificent dragonfly was in our garden last week.
 I have no idea what sort of dragonfly he or she is, have tried to identify but ended up completely confused. Eyes and thorax were dark, nice yellow 'racing stripes' on thorax. Very bright blue spots on the back were the wings attach ...
 that part of a dragonfly looks so ... mechanical and exposed somehow, like the engine is showing. I've always thought of dragonflies as being rather like helicopters and after I had taken loads of photos this one took off just like a mini-helicopter - vertical and with a really neat spiral.
Subscribe to:
Posts (Atom)