Knitting Patterns by Lyndell

Halter Neck Dress for Neo Blythes - here
Design your own Dress for Neo Blythes - here
Gum-Nut Hat for Neo Blythes - here

Who? What? eh?

This is the blog of a constant crafter - a 'showcase' for some of the things I make, some hints for crafting & recylcing - lots of photos and some words. I hope it will inspire.
Please Note: all photos are Copyright.


Monday 27 February 2012

The Red Carpet

As many of you know, my Blythe dolls are stars of Stage & Screen ... so there has been quite a flurry of excitement over the last few days, selecting dresses, having their hair styled etc etc in preparation for The Big Event with Gold Statuettes.  Their jewelry arrived just in time ...
Lillian wore stunning diamond cuffs with a vintage Valentine dress without a thigh high split - pink lips and flowing hair. 
 
Audrey chose an Open-the-Door gown from the 1954 collection - retro and cute with a cherry print.  Her pretty emerald choker exactly matches the colour of her eyes.

 Their jewels are from a wonderful Etsian - Beatrice lives in Sweden & she makes really beautiful jewelry for dolls & humans.  Her bead-work is incredibly delicate and neat!  Even the stamp on the envelope made me smile ...

Sunday 19 February 2012

Busy Sewing with Lovely Fabrics

This last week I've been busy sewing some yummy fabrics - mostly soft silk & rayon velvets, some of them with devore or burn out designs.


I've been making more of my 1930's style Kimono Cocoon Wraps - I never know quite what to call them but they are rather lovely as a throw it on, instant touch of glamour. 

I've kept one in this mauve / grey colour and wear it all the time.


The 7 I've just finished making are all for my Etsy Shop.
Dark Blue Florentine Devore
Lt Blue Florentine Devore
Mauve with Black printed Devore


Lovely Rich Ruby Red


Plain Velvet in a Smoky Brown / Grey colour
 And - because I've been asked so many times - I've made some very Bridal ones too.  One in ivory lace -


The other in lovely soft rayon / silk velvet ... most of these Kimono Wraps have beads strategically placed for their weight (as did the original vintage 1930's wrap that I have copied).  I put a fall (or 3) of beads on the centre back point and groups of beads on the front corners.   Here are the pearls I sewed on the bridal velvet Kimono - it is a lovely buttery soft velvet.


Thursday 16 February 2012

Forensic Analysis of a 1920s Flapper Dress

I've been doing a lot of mending lately - but sometimes I am given something to mend and it is just impossible - the garment is past it - gone - dead - beyond mending.   So this post comes with a warning - if the sight of a deceased garment is offensive to you, please leave now.  However, if you would know something of a genuine 1920s flapper dress then you are welcome to stay while I examine this fragmentary frock.

Here it is spread out as best I could - every time I touched the fabric it tore under my fingers.

And the colour shows quite orange in that photo and quite apricot in some of the others.  I think originally it was a peachy apricot colour, I suspect it has darkened / gone orangish with age.  Obviously this poor thing was very poorly stored and silk crepe chiffon is a fragile fabric.

Please - if you are lucky enough to own a 1920s frock do NOT store it hung up as the weight of the beading destroys them.  If you own a dress with sequins - anything earlier than the 1960s - NEVER get it wet - early sequins were made of gelatine & gelatine dissolves in water.  Now I put a very late date on the use of gelatine sequins because my mum made me a costume in 1969 with black sequins on it and those sequins went to goo when put in water - gelatine!  They were probably very old stock but dressmakers are hoarders.

Well - back to this dress - no sequins on this one.  But what we see in the photo above is a square skirt with (in the middle) a small portion of the bodice.  The square skirt, when worn, would've hung in points - this uneven hem indicates that it dates from the late 1920s.

Some detail of the beading and gold-thread embroidery.  The design is sort-of Art Deco.  Many of these dresses were made (or at least beaded) in France / Paris and it is said that most of this work was done by Russian refugees from the 1917 revolution.  To me, some elements of this design (& on other 1920s frocks I've examined) are similar to designs on Eastern Orthodox Icons. 

In the centre of the intersecting circles there are 'wheels' worked in metal (gold?) wrapped thread.  All the beads are glass and there are 2 types.   Clear glass short bugle beads that were silvered inside  - 'silver lined'  (like the clouds!)  now mostly tarnished and showing dark in the photos.  And lovely milky glass short bugle beads - I'm not sure if they make beads like this now - they are white glass and the tube is not round but a hexagon / octogon - they have flat sides and thus reflect more light.  I've also seen milky glass beads with micro-grooves on the surface - they were not so twinkly.
A corner
Most 1920s flapper frocks were tambour beaded - here is a YouTube clip that shows you how this is done.  And a lovely movie to watch (they show tambour being worked and people diving under the table / frame to see the right side) is "A Common Thread"  the original title is "Brodeuses" (2004).

Some things to mention about tambour work:
  • it is done up-side down with the wrong side facing the embroiderer
  • that wrong side has a distinctive chain stitch - and if you pull a thread a whole row of beads will unravel
  • stretching the fine fabric onto the tambour frame (drum tight - tambour is French for drum) and punching the fine tambour hook through the fabric probably damages a fragile silk - not noticible in the short-term of course but in the long term ...
 Here we see the wrong side of the beading - note the chain stitch.  Also the gold thread embroidery and the hand-stitched hem.   A lot of woman-hours went into making these dresses.

Love the beads along the hem-line but I wonder it they snagged the wearer's stockings?


Something else to note about 1920s beaded "flapper" dresses is that they were meant to be danced in.

With this dress the square skirt would've hung from a very low 'waist' - it would've swung and moved quite nicely during a tango with all the weight of those glass beads.


And in this last photo you can see what remains of the bodice - and a double row of the silvered beads where bodice met skirt.

Seems that the bodice was quite heavily beaded - I think that row of circles in bunches is going up the side of the bodice - presume it was the same on the other side.  The back was usually beaded just as much as the front - remember - they were made for the dance-floor.

Tuesday 14 February 2012

Happy St Valentines Day Everyone


from The Love Bird


must run now & spread the lurv

Thursday 9 February 2012

Once were Sarongs

At the very beginning of this year I was gifted some wonderful, unused cotton sarongs that were bought in Malaysia over 20yrs ago.  This bright purple one was still wrapped and labeled.

Hot stuff indeed - the photo doesn't do the strong bright colours justice.  Well, I never wear sarongs but I do enjoy working with them & sewing them into something.  Sarongs and Saris are often great fun with their border prints and panels of different designs - working with all those elements and making the most of them makes the cutting out quite a challenge.


I decided to make my granddaughter a dress from the purple sarong - with such bright & busy fabric a simple design is best and I found this in my collection of vintage patterns. 

Made some adaptations - a gathered skirt rather than pleats that would need ironing after every wash, also made the longer sleeves but with elastic cuffs.
Border around the hem of the skirt and the big flowers 'grow' up the front.


I should've placed the butterflies better - though these 2 seem to be talking to each other!


The 2nd sarong was black&white - and I forgot to take photos before I sewed it up.  Quite a busy print with borders and panels of zig-zag design and lush bouquets etc.

It is a lovely cool cotton fabric so I made myself a summer shirt - loose fitting with elbow length sleeves and a mandarin collar.  

Placed the strong zig zags up the fronts either side of the buttons, put a bouquet on the back and the borders round the hem again.


It looks quite good on too  :-)

Monday 6 February 2012

Make Do & Mend

Whether it is for reasons of frugality, or thumbing your nose at consumerism, or because you can't bear to throw out a favourite garment - it feels good to Mend, Repair, Recycle...

Oh Dear!  I had managed to get super-glue on a favourite singlet top - it is a flattering pistachio green, a nice rayon knit and it has a matching cardigan so I did not want to toss it!
But nasty dark (and stiff) spots of glue down the front - one big splodge and a trail of small ones. 

Now, I also like to mend things in a way that adds to them - Up-cycle rather than Re-cycle - and my favourite method of hiding small stains or mended holes is by embroidering something pretty over the top.  I often work lazy-daisy flowers (there are quite a few YouTube clips if you want to know how to do these) but I felt that this top deserved something a bit more special so I worked some Bullion Stitch roses, with buds etc.


 The fun part comes first - selecting which threads  to use. 
2 greens ... not too blue or 'sweet'
and for the flowers I went with shades of apricot instead of the more obvious pinky rose colours.

I like the 'Susan O'Connor' bullion stitch rose - basically you start with the darkest shade & work a bullion loop (in the middle of that big stain).  And because I'm not very good at this - I needed 2 loopy stitches!


Then with the next shade work bullion stitches spiralling around that centre...
Sorry for the blurry photo
Then progress to a lighter colour and work more bullions around ...  And even if you are not very skillful the result is still quite pretty.  Especially if your photos are blurry!!
The splash pattern of small stains seemed obvious as a 'rose bud' on a curving stem.  Here is the bud - 3 bullion grubs with a dark one in the middle.
 Rose and bud on finished stem - used stem stitch for the stem (naturally!) and bullion grubs beside the bud & for the leaves; small in the dark green with long grubs above in the light olive colour.


SO - those stains are quite disguised now but those flowers are awkwardly placed and the rose is floating in a very isolated way.  So I put the singlet on Daphne (my mannequin) and planned with pins how to make the emboridery look like a Deliberate Design Decision but with a minimum of additional work!     
Oops - obviously needs to be ironed, but one of those creases inspired the placement of another bud-on-stem.
And here is the finished singlet top - worked another full Susan O'Connor rose & a bud to keep that first rose company, and a 2nd bud-on-stem curving in the other direction.

Wednesday 1 February 2012

Fairy Wings for Blythe - Workshop

I promised a workshop on the Fairy Wings I made for a recent swap of Blythe Doll Clothes (this post) - so here it is.  
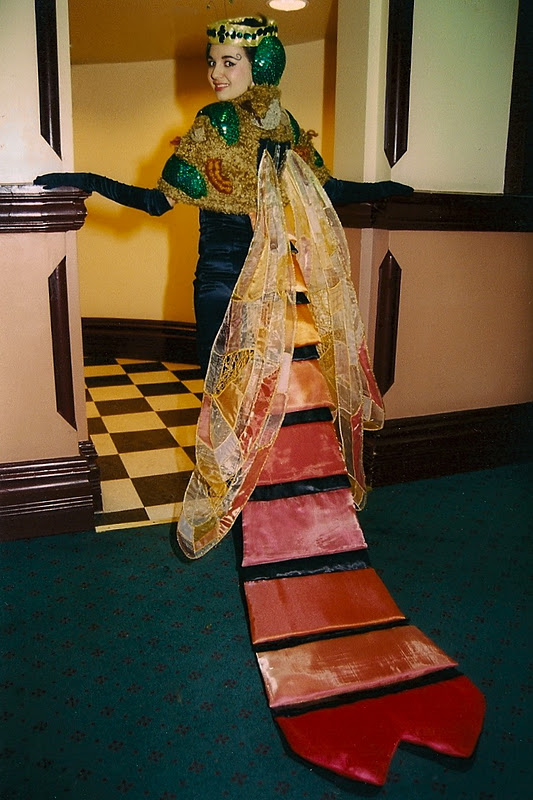
Well, there must be easier ways to make dolly wings but this method is based on what I did to make the much larger wings for this human costume ...
Made that Damselfly (aka Mayfly) costume back in 2003 - wasn't too proud of most of it but the wings were OK and since 2003 they've been hanging in our lounge-room as pseudo curtains ...


They're a bit warped and faded now but considering that they are nearly 9yrs old and those polyester fabrics are inherently fragile - I think they're doing quite well! 


Here is a close-up.


So I chose to use very similar techniques to make much smaller wings for a Blythe doll.  Wire, with twinkle fabric and machine-made free-form 'lace'.
 

You will need (pls note, things get called different things in different countries / areas):
Stationery items : paper, pencil / pen, tissue paper, glitter glue, glitter pen (an optional extra)
Hardware items : thin flexible wire (I used florists' wire but anything easy to bend will do), wire cutters, pliers to bend the wire, plumbers' tape (aka teflon tape - there are white, pink & yellow tapes and they do differ, I find that the white is the easiest to use.  Florists use very similar stuff and theirs is either white or green and it costs a lot more).  
Now I dare you to go into a Hardware Shop and tell the butch blokes there that you need wire & plumbers' tape to make fairy wings for your doll! 
Fabric & Haby : transparent fabric (organza, organdie, twinkle organza, mirror organza),  bits or ribbon - braid - metallic embroidery thread (these are for the free-form 'lace'), stabiliser that dissolves in water (this has many different names - Solvie, Dissolve-Away etc) beads, a bit of felt or ribbon (for the center back reinforcement), ordinary sewing thread, pins, scissors ...
Hint : keep to a limited colour scheme for your wings as they could easily become really crazy.

OK here we go:
First design your wings and trial them in paper (pin paper onto your doll's clothing and check for size, shape ...)
Now use your paper wings as the pattern to shape the wire.  2 important points here
  1. minimise the number of wire pieces to minimise joins.  I had 3 pieces of wire - 1 went across the top from one curly bit to the other,  1 formed the rest of the wing outline and a third (not shown in this pic) made the 'hooks' that go over dolly's shoulders.
  2. where one wire joins another avoid T joins by bending one wire into a L at the end - that little bit will lie against the other wire and when bound with the tape it'll be stable.  You can see the thicker bits here where there 2 wires meet.
Paper pattern, shaped wire being bound with teflon tape - Note thick bits where wires are joined
An explanation - you can join wire by soldering but I dislike soldering.  Nasty hot things, acid in the flux, lead in the solder ... yuk!  Plumbers' / Teflon tape is my preferred method of joining wire - I've used it for costumes and head-dresses, seems strong enough.

SO - bend the wire to shape and cover with the plumbers' / teflon tape - it is stretchy stuff and it clings to itself.  Pay particular attention to joins, and make sure any ends & sharp corners are covered nicely. 

Plot fabric / 'lace' areas on tissue paper.
In this photo you can see those over-shoulder 'hooks'.

Pin wire wings to tissue paper and plan the area that'll be free-form 'lace'.


I found I could trace this onto my dissolve-away stabiliser ... but remember that it will shrink in the sewing - a lot!  If you can, using a hoop while sewing the free-form lace will help stop the shrinkage.


You can see my dissolve-away under the pretty stuff
Now for the fun of deciding what to use for the free-form lace ... I had some metallic embroidery thread, thin satin ribbon, some transparent ribbon & a shabby old silver tassel ...

Now go slightly crazy on the sewing machine ... sew the pretty stuff to the stabiliser in a random free-form manner.  You can use metallic thread in your machine, use zig-zag, wave st, fancy stitches, couch other stuff (like threads from that old tassel), just sew over the stabiliser ...  

I used the stabiliser double - but it is old stuff and prone to tearing!
Ack!  what is that mess?

This messy business is what I ended up with - check that it is large enough - mine did shrink with the sewing!


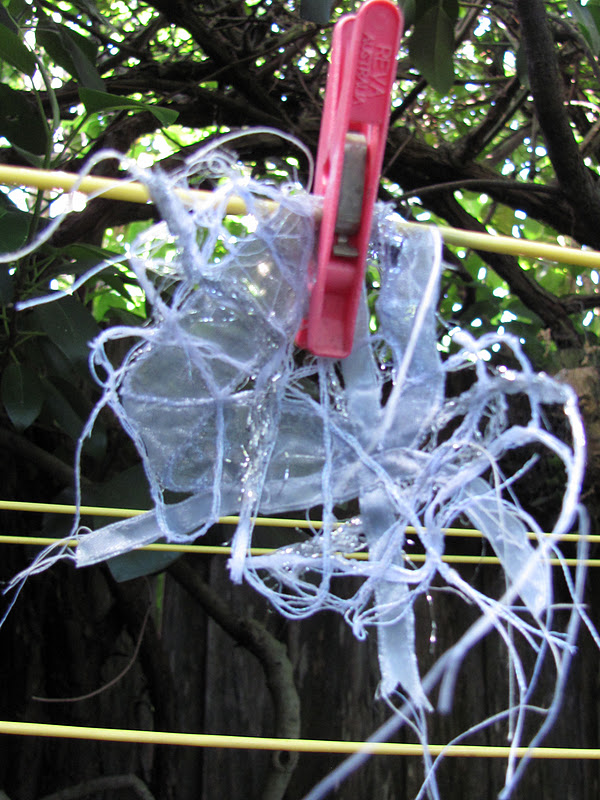
"I'm melting! melting! Oh, what a world! What a world!"
Now - dissolve the stabilser.  Mine is old stuff and I think it is gelatine based - it goes very slimy in the water - yuk!!!   And even though I rinsed really well, some residue remained to make the 'lace' a bit stiff - which is OK really.


Dry your free-form lace and admire it twinkling in the sunlight ...
 Back to the drawing board ... trace wing designs on tissue paper - pin to fabric (I used polyester "mirror organza" doubled - not sure why I doubled it!) 
Flip that over and pin the now dry 'lace' in place, hold everything up to the light so you can see where - back to the sewing machine and sew a guide line round the edge where lace & fabric meet (shown a little darker above).  You can sew through the tissue paper, then tear it away and work a tight zig-zag (satin-stitch, like for a button-hole) over the guide line.

 Cut the fabric from behind the 'lace'.  Be careful!


Fabric & 'lace' - fabric snipped because I kept forgetting to take progress pictures!

The next step is not much fun but your work will now start to really look like wings.

Pin fabric & lace piece to the wire and machine it.  At this stage you can also add the felt or ribbon for the centre back reinforcement.  See photo.

If the needle hits the wire and it probably will - it will probably break.  
Please Wear Eye Protection 

Use zig-zag stitch - wide enough to go over the wire.  I go around once with a slightly shorter than normal length stitch but not the tight 'satin stitch' then later I go round again ...
Cut the fabric and any 'lace' ends around the wire (on the outside!)  Then I go back to the machine and zig-zag a tight 'satin stitch' around again - no pins this time.   Concentrate on getting the corners to look nice.

Now for some more fun!   I hand-stitched glass seed beads & glued some bigger beads to the ends of the curly bits.  Then Glitter Glue all around the wire.  It is only paper glue but it seems to add strength, it certainly keeps the thread ends tidy and it is pretty.

I couldn't find any blue glitter glue - but I had a glitter pen in the right colour - so I drew blue on the edges and then put glitter glue on top.


Improvements : Next time (and my Blythe dolls say they NEED some wings of their own - so there will be 'next times'!)  I would make the centre back section less wide - it doesn't need to be so 'reinforced'.  Just a little bit of ribbon perhaps on the inside to stop the wings getting caught on velcro or other fastening on the doll's clothes.
Also, I did sew elastic to the shoulder 'hooks' in loops to that centre back bit - I think this was unnecessary and it was certainly fiddly.  Next time I'll just make the shoulder 'hooks' a bit longer.

Violetta models the fairy costume