Knitting Patterns by Lyndell

Halter Neck Dress for Neo Blythes - here
Design your own Dress for Neo Blythes - here
Gum-Nut Hat for Neo Blythes - here

Who? What? eh?

This is the blog of a constant crafter - a 'showcase' for some of the things I make, some hints for crafting & recylcing - lots of photos and some words. I hope it will inspire.
Please Note: all photos are Copyright.


Friday 30 November 2012

Christmas Time

Well, I did have grand plans to knit lots of cute red & white, fair-isle (jacquard) patterned Blythe-sized clothes this year and have them in my Etsy shop BytheStar in time for Christmas Shoppers.
Sigh - I have managed to knit one, 1, singular, extremely limited edition, OOAK, hat.


It is quite cute and can be worn flopping over or standing up ...

My little model here has not yet been properly introduced.  But, you see Bunny isn't really mine and I'm trying very hard not to bond with her too much.

One of my ongoing, long-term projects is for my Granddaughter - the plan is that when my GD is old enough to look after a "good" dolly properly I will give her a Blythe doll and a collection of outfits.  There will be 2 outfits for every year of my GD's life - a Spring/Summer outfit and an Autumn/Winter one - to reflect the fashion of the time.

I did have an ADG Blythe doll set aside but was a little dissatisfied with that option and thought a doll that was released the same year as my Granddaughter was born would be better.  Then this lovely "Welcome Winter" came available and ... WW was the first doll Takara released in 2008.  Perfect.

Only trouble is that she is so sweet I don't have the heart to put her back in the box!

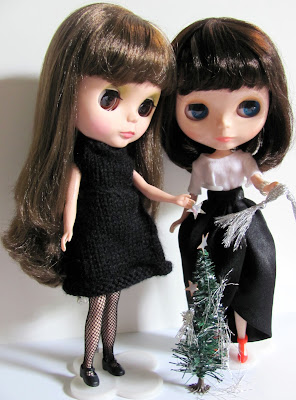
Bunny and Audrey have become great friends - two little girls together!   After the photo-shoot for the hat, they decided the Christmas tree needed more decorations.
  

I think I'll have to get a larger tree next year!

Tuesday 27 November 2012

Snowmen - in Australia?

Audrey :  Our mummy has been busy knitting - let's see what she has been making ...
... hmmm, looks like a lot of white peanuts and coloured worms!

Imogen :  I think this is the prototype - they are tiny little snowmen.
 Audrey : Looks cute, but what is a snowman?


Every year I knit little Chrissy decorations as small Christmas gifts for family & friends - last year I made lots of Santas (see this post)   this year it is to be Snowmen.


Both Santas and Snowmen are MochiMochi Land patterns.   


As I've started quite late this year I am glad that the snowmen are rather faster to make than the Santas were :-)

And I love the way they sometimes turn out a bit different - this one has quite a 'personality'.


Do you know the collective noun for a collection of Snowmen? 
Some say a "dusting of snowmen"
Others say a "melt of snowmen"
I live in Australia - so I'll go with the melt!

A Melt of Snowmen!
And here is a little bit of Snowmen Spam.

Friday 23 November 2012

Tatting tittle tattle

I going to be teaching a small class the basics of Tatting ... (tomorrow, Sat 24 Nov at Morris & Sons in Sydney).

So have just spent a few hours doing some prep ...
spare thread, examples of tatting, examples of different shuttles, and shuttles all set up to begin the learning process.

 Having been really frustrated by the insufficient diagrams in most "How to Tat" manuals, I've put together my own teaching notes with lots of photos of each stage ...


 Rather embarrassing seeing how old and wrinkled my hands are!   

But - those are working hands, they make things!

Things like this - a brooch made from bits of tatting.

I frequently start something in tatting - but get bored with the design or make a mistake or decide that I don't like the way it is turning out ...

Rather than waste all that work I put several of those bits of lace together, sometimes I put a "gem" on top, a brooch back gets stitched behind and ...
I have a pretty brooch  :-)

Sunday 18 November 2012

Making Blythe Doll Earrings from Pins - A Tutorial

Having boasted that I'd worked out a way to make earrings for Blythe from pearl-head dress-making pins, I was asked "How?"  so ... here is a tutorial.

Not all Blythe dolls have the piercings to wear earrings - in my dolly family only Audrey (a Simply Chocolate) has the requisite 'piercings'.


In this photo, the gold things on the left are the Takara stock stud earrings Audrey came with (she also has some optional op-art dangles that go on those studs).    
The pearls are what I made - from pins.

If you look at Takara's earrings closely you'll see that the posts are slightly flattened.  The idea seems to be to insert the earrings with the wider part going horizontally to doll's head (up-down)  then once inserted, if you turn the earrings, about a quarter turn, they lock in place.
This basic shape is what I try to replicate with the pins.


You need some pins, some jewelry-making pliers to bend the pins and something to cut the pins.


The wire cutters on the RH here are great for cutting,  and the little long-nose jewelry pliers on the LH are great.  The round nose pliers, here in the middle, are handy but the flat surface on the long-nose is required for the final 'squishing' process.


Cut the pin - about 1/2 an inch (that's 14mm) from the 'head'.  Be careful - work inside a box or something and wear glasses or goggles to protect your eyes from flying pin wire!

And bend the wire back on itself


This is the hard part and not all pins will bend nicely.  Those lovely black pins in the photos above were too stiff and strong - they resisted bending and finally the wire snapped.  These cheap 'pearl heads' were the most successful.


Try to avoid this cross-over thing happening as you are bending the pin.


 Use the flat part of the pliers to flatten the curve.  You need the wire to be a really tight U ... narrow enough to fit into the doll's ear piercing but not so narrow that it falls out.


Check the fit - remembering to insert with the width of that U-shape held horizontally.


The final tweaking for a perfect fit is fiddly, the teeny-est tiny-est squish with the pliers to make it perfect - just a bit too far and the earring is loose and will fall out! 

Audrey has decided that these red earrings are just perfect for Christmas!

Sunday 11 November 2012

Animal BackPacks & a fur-sewing tutorial

In a previous post I mentioned that I was being some animal back-packs ...
using an old Butterick pattern that I've used several times before. 

Here they are - all finished.  A mauve bunny for my granddaughter, the brown puppy for my grandson and the bunny with his eyes placed rather too high and startled looking ... well that one is mine! 


Bunny backpack for granddaughter

Puppy backpack for my grandson
 Here is a bunny in situ on my mannequin - they slump when there is nothing in their tummies.  They are working back-packs - the zip to access the 'bag' is behind their heads.

And now I thought I'd do a little tutorial on working with fake fur.  Faux Fur 101

Take care with your cutting out - work with the 'nap', the lay the fur lies (down the length of the fur fabric).  Lay out the pattern pieces so that the fur will brush down the body, limbs and ears of a toy.   Often the fur lies going away from the nose of a toy - but I decided to make these animals with the fur on their faces going the other way.  This is cheap fake fur and the backing is a very loose 'weave' that I thought would look rather ugly if it showed around their noses.  Always think about the direction of the fur when laying out the pattern pieces.

All that is very important but for this tute I thought I would concentrate on another aspect of working with fur.  Because sewn furry things (toys, collars, whatever ...) always look better if the seams are not made too obvious by being either 'bald' or having the fur caught in the seam. 

Firstly - be careful when cutting out fur fabric to cut the backing fabric but not the fur.  Slide the blade of your scissors along the fabric, lifting the furriness. 

If you look closely at this photo - the lower, horizontal edge looks furry (the fabric was cut but not the fur) whereas the vertical edge looks blunt because the furriness was cut along with the fabric.


When you sew the fur pieces together the seams often look like this ...


However, if you take the time (and it is fiddly work) to pluck the fur out of the seams, you can get that seam to look like this - practically invisible!
 

 I like to use something blunt so I don't cut the fur or hurt my fingers!  Be careful not to pull out the threads of the backing fabric, especially if it is a loose weave like this.

 Two things that will help with this fiddly job - use a longer stitch length than usual, but not so long that your work gathers.


 And - when pinning the pieces together, sometimes you can persuade most of the furriness to lie inwards like this.  You might need to use more pins than normal to help the fur to stay there.


I hope these hints are helpful.