It is now finished :-) and I thought you might like to see some progress pictures of the most difficult part of this costume - the head. Back at the end of last year I posted about the cardboard mock-up. This (sort of) became the pattern.
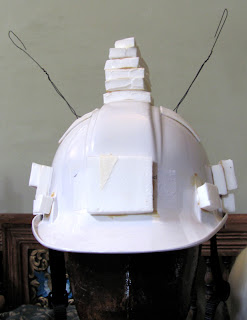
But as with all engineering projects - you have to start with some foundations ! In this case a hard-hat - the harness inside fits the wearer's head, the brim will support the dog's nose, it is firm and you can glue things to it. Things like supporting foam structures and wires for the ears. Reminded me of "My Favourite Martian" - Ooops that's aged me !
I'm always forgetting to take progress photos : the intervening processes were ... messy - bits of PE foam everywhere!
But here the head is taking shape - head, nose, lower half of the ears - all done. Here I was checking that the end of the snout would work.
That wire nose / muzzle is the only place the wearer will be able to see through. It is important to give the wearer as much 'sight' (and ventilation) as possible without making it too obvious that there is a person inside the animal.
And yes, I was using my kitchen bench as the work area - managed not to poison anyone!
The next step was the lower jaw, and I'm starting to work with the covering fabrics. This is a jaw - hardly any of that pretty pink satin will show - but it needs to be there.
And here is the jaw glued and stitched in place - and some fleecy on the nose as well ... pins keeping everything in place while the glue dries.
OK - now for the rest of the nose - a bit of artistic drapery here as this hound dog has jowls. That's the original drawing of the Doggy - he is quite a cartoon type character.
Nose done - next the ears. Tried to make them floppy and there is a little movement to the upper halves of the ears when the wearer moves.
Skipping a bit now - here most of the fur is on and I'm checking that the 'cape' will work. The cape is to cover the neck, it will go under the shirt.
 Intervening processes :
 - Some padding to refine and soften the shape of the head
- Lots of pattern-making (the fur patterns are not the same as the ones for the foam)
- Lots of confusion about the direction/s of the fur - it grows 'up' on the front & back but sideways and around on the sides. Sounds odd but it works
- Then cutting and sewing fur - a little gluing in place with lots of hand stitching.
Eye parts -
Eyes finished - felt and satin, machine and hand applique / embroidery. He has a bit of a "twinkle" in his eyes.
Another little touch ... doggy needed something between his ears :-) a bit of a "hair do". In the photo in the mirror above, there is a mess of fur fabric where the front meets the back - a problem that needed a nice solution.
Once again I had trouble sourcing suitable fur fabric - I just couldn't find that "hair of the dog" [sorry!] Eventually I bought a shaggy fur cushion and chopped it up!
I think the result is cute -


Wow, this is impressive! Great job!
ReplyDeletethanks :-) there was loads of "problem solving" with doggy - but I'm happy with the end result.
ReplyDelete