Knitting Patterns by Lyndell

Halter Neck Dress for Neo Blythes - here
Design your own Dress for Neo Blythes - here
Gum-Nut Hat for Neo Blythes - here

Who? What? eh?

This is the blog of a constant crafter - a 'showcase' for some of the things I make, some hints for crafting & recylcing - lots of photos and some words. I hope it will inspire.
Please Note: all photos are Copyright.


Monday, 6 February 2012

Make Do & Mend

Whether it is for reasons of frugality, or thumbing your nose at consumerism, or because you can't bear to throw out a favourite garment - it feels good to Mend, Repair, Recycle...

Oh Dear!  I had managed to get super-glue on a favourite singlet top - it is a flattering pistachio green, a nice rayon knit and it has a matching cardigan so I did not want to toss it!
But nasty dark (and stiff) spots of glue down the front - one big splodge and a trail of small ones. 

Now, I also like to mend things in a way that adds to them - Up-cycle rather than Re-cycle - and my favourite method of hiding small stains or mended holes is by embroidering something pretty over the top.  I often work lazy-daisy flowers (there are quite a few YouTube clips if you want to know how to do these) but I felt that this top deserved something a bit more special so I worked some Bullion Stitch roses, with buds etc.


 The fun part comes first - selecting which threads  to use. 
2 greens ... not too blue or 'sweet'
and for the flowers I went with shades of apricot instead of the more obvious pinky rose colours.

I like the 'Susan O'Connor' bullion stitch rose - basically you start with the darkest shade & work a bullion loop (in the middle of that big stain).  And because I'm not very good at this - I needed 2 loopy stitches!


Then with the next shade work bullion stitches spiralling around that centre...
Sorry for the blurry photo
Then progress to a lighter colour and work more bullions around ...  And even if you are not very skillful the result is still quite pretty.  Especially if your photos are blurry!!
The splash pattern of small stains seemed obvious as a 'rose bud' on a curving stem.  Here is the bud - 3 bullion grubs with a dark one in the middle.
 Rose and bud on finished stem - used stem stitch for the stem (naturally!) and bullion grubs beside the bud & for the leaves; small in the dark green with long grubs above in the light olive colour.


SO - those stains are quite disguised now but those flowers are awkwardly placed and the rose is floating in a very isolated way.  So I put the singlet on Daphne (my mannequin) and planned with pins how to make the emboridery look like a Deliberate Design Decision but with a minimum of additional work!     
Oops - obviously needs to be ironed, but one of those creases inspired the placement of another bud-on-stem.
And here is the finished singlet top - worked another full Susan O'Connor rose & a bud to keep that first rose company, and a 2nd bud-on-stem curving in the other direction.

Wednesday, 1 February 2012

Fairy Wings for Blythe - Workshop

I promised a workshop on the Fairy Wings I made for a recent swap of Blythe Doll Clothes (this post) - so here it is.  
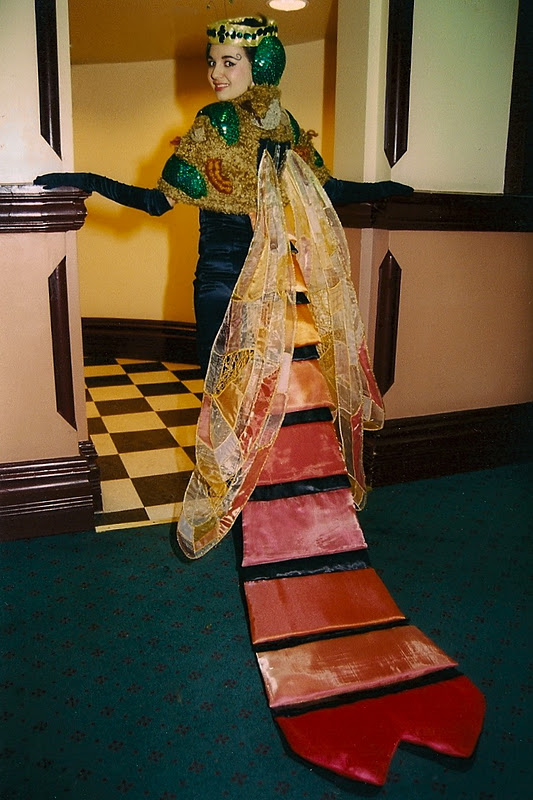
Well, there must be easier ways to make dolly wings but this method is based on what I did to make the much larger wings for this human costume ...
Made that Damselfly (aka Mayfly) costume back in 2003 - wasn't too proud of most of it but the wings were OK and since 2003 they've been hanging in our lounge-room as pseudo curtains ...


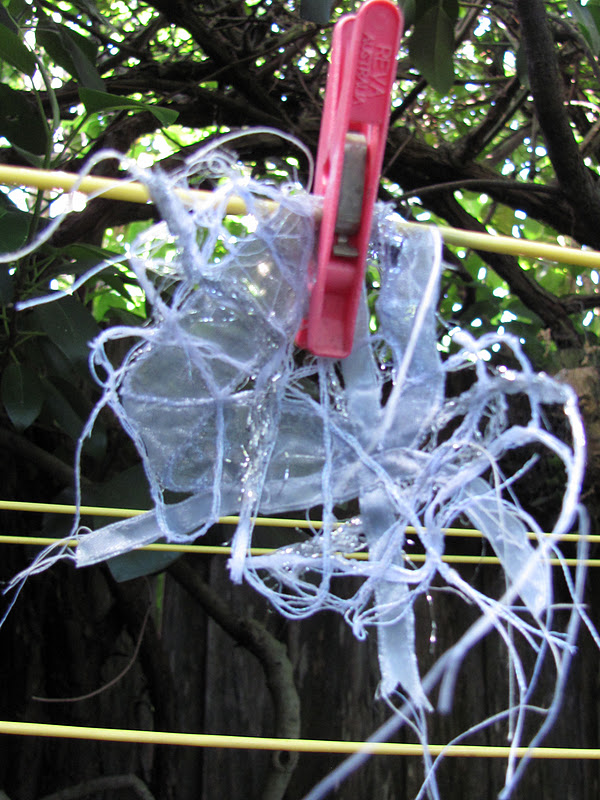
They're a bit warped and faded now but considering that they are nearly 9yrs old and those polyester fabrics are inherently fragile - I think they're doing quite well! 


Here is a close-up.


So I chose to use very similar techniques to make much smaller wings for a Blythe doll.  Wire, with twinkle fabric and machine-made free-form 'lace'.
 

You will need (pls note, things get called different things in different countries / areas):
Stationery items : paper, pencil / pen, tissue paper, glitter glue, glitter pen (an optional extra)
Hardware items : thin flexible wire (I used florists' wire but anything easy to bend will do), wire cutters, pliers to bend the wire, plumbers' tape (aka teflon tape - there are white, pink & yellow tapes and they do differ, I find that the white is the easiest to use.  Florists use very similar stuff and theirs is either white or green and it costs a lot more).  
Now I dare you to go into a Hardware Shop and tell the butch blokes there that you need wire & plumbers' tape to make fairy wings for your doll! 
Fabric & Haby : transparent fabric (organza, organdie, twinkle organza, mirror organza),  bits or ribbon - braid - metallic embroidery thread (these are for the free-form 'lace'), stabiliser that dissolves in water (this has many different names - Solvie, Dissolve-Away etc) beads, a bit of felt or ribbon (for the center back reinforcement), ordinary sewing thread, pins, scissors ...
Hint : keep to a limited colour scheme for your wings as they could easily become really crazy.

OK here we go:
First design your wings and trial them in paper (pin paper onto your doll's clothing and check for size, shape ...)
Now use your paper wings as the pattern to shape the wire.  2 important points here
  1. minimise the number of wire pieces to minimise joins.  I had 3 pieces of wire - 1 went across the top from one curly bit to the other,  1 formed the rest of the wing outline and a third (not shown in this pic) made the 'hooks' that go over dolly's shoulders.
  2. where one wire joins another avoid T joins by bending one wire into a L at the end - that little bit will lie against the other wire and when bound with the tape it'll be stable.  You can see the thicker bits here where there 2 wires meet.
Paper pattern, shaped wire being bound with teflon tape - Note thick bits where wires are joined
An explanation - you can join wire by soldering but I dislike soldering.  Nasty hot things, acid in the flux, lead in the solder ... yuk!  Plumbers' / Teflon tape is my preferred method of joining wire - I've used it for costumes and head-dresses, seems strong enough.

SO - bend the wire to shape and cover with the plumbers' / teflon tape - it is stretchy stuff and it clings to itself.  Pay particular attention to joins, and make sure any ends & sharp corners are covered nicely. 

Plot fabric / 'lace' areas on tissue paper.
In this photo you can see those over-shoulder 'hooks'.

Pin wire wings to tissue paper and plan the area that'll be free-form 'lace'.


I found I could trace this onto my dissolve-away stabiliser ... but remember that it will shrink in the sewing - a lot!  If you can, using a hoop while sewing the free-form lace will help stop the shrinkage.


You can see my dissolve-away under the pretty stuff
Now for the fun of deciding what to use for the free-form lace ... I had some metallic embroidery thread, thin satin ribbon, some transparent ribbon & a shabby old silver tassel ...

Now go slightly crazy on the sewing machine ... sew the pretty stuff to the stabiliser in a random free-form manner.  You can use metallic thread in your machine, use zig-zag, wave st, fancy stitches, couch other stuff (like threads from that old tassel), just sew over the stabiliser ...  

I used the stabiliser double - but it is old stuff and prone to tearing!
Ack!  what is that mess?

This messy business is what I ended up with - check that it is large enough - mine did shrink with the sewing!


"I'm melting! melting! Oh, what a world! What a world!"
Now - dissolve the stabilser.  Mine is old stuff and I think it is gelatine based - it goes very slimy in the water - yuk!!!   And even though I rinsed really well, some residue remained to make the 'lace' a bit stiff - which is OK really.


Dry your free-form lace and admire it twinkling in the sunlight ...
 Back to the drawing board ... trace wing designs on tissue paper - pin to fabric (I used polyester "mirror organza" doubled - not sure why I doubled it!) 
Flip that over and pin the now dry 'lace' in place, hold everything up to the light so you can see where - back to the sewing machine and sew a guide line round the edge where lace & fabric meet (shown a little darker above).  You can sew through the tissue paper, then tear it away and work a tight zig-zag (satin-stitch, like for a button-hole) over the guide line.

 Cut the fabric from behind the 'lace'.  Be careful!


Fabric & 'lace' - fabric snipped because I kept forgetting to take progress pictures!

The next step is not much fun but your work will now start to really look like wings.

Pin fabric & lace piece to the wire and machine it.  At this stage you can also add the felt or ribbon for the centre back reinforcement.  See photo.

If the needle hits the wire and it probably will - it will probably break.  
Please Wear Eye Protection 

Use zig-zag stitch - wide enough to go over the wire.  I go around once with a slightly shorter than normal length stitch but not the tight 'satin stitch' then later I go round again ...
Cut the fabric and any 'lace' ends around the wire (on the outside!)  Then I go back to the machine and zig-zag a tight 'satin stitch' around again - no pins this time.   Concentrate on getting the corners to look nice.

Now for some more fun!   I hand-stitched glass seed beads & glued some bigger beads to the ends of the curly bits.  Then Glitter Glue all around the wire.  It is only paper glue but it seems to add strength, it certainly keeps the thread ends tidy and it is pretty.

I couldn't find any blue glitter glue - but I had a glitter pen in the right colour - so I drew blue on the edges and then put glitter glue on top.


Improvements : Next time (and my Blythe dolls say they NEED some wings of their own - so there will be 'next times'!)  I would make the centre back section less wide - it doesn't need to be so 'reinforced'.  Just a little bit of ribbon perhaps on the inside to stop the wings getting caught on velcro or other fastening on the doll's clothes.
Also, I did sew elastic to the shoulder 'hooks' in loops to that centre back bit - I think this was unnecessary and it was certainly fiddly.  Next time I'll just make the shoulder 'hooks' a bit longer.

Violetta models the fairy costume


Monday, 30 January 2012

Putting up Preserves

Isn't that a wonderful old phrase?  Putting up preserves ...  not that I do much of that sort of thing as I'm not overly fond of cooking.  However, occasionally I make stuff that goes into jars and the warm glow of Successful Domesticity and knowing that I have jars of yummy goodness in the fridge - well it is worth the effort.  So a fortnight ago I made marmalade ...


 It certainly wouldn't win a ribbon at a Country Show but I'm rather eccentric about my marmalade ... I like it super chunky, very tart and with loads of ginger.

My last marmalade was a bit 'runny' so I cut right down on the amount of water ... this time I used 2kg oranges + 1 lemon and lots of sliced ginger, 3 cups water (just enough to cover those chunks) and an equal amount of sugar (3 cups).  The result is probably more 'cooked orange peel' than actual marmalade and it is tart enough to 'put hair on your chest'.  In other words - it's just about perfect :-)


Then this last weekend I made olive tapenade.  What a wonderful idea tapenade is - olives that you can spread on bread - perfection!
And so easy to make.  Take oodles of kalamata olives, chop & stone them into a blender, add a splash of olive oil, a generous amount of garlic and blend.  YUM!


And for a final dose of Domestic Bliss - a sleeping cat.  Our elderly Cornish Rex doing what she does best.


Tuesday, 24 January 2012

Beadiness

I admit to having something of a love / hate relationship with beads. 
Love what they do but strongly dislike sewing them on.  
Well, you can do a lot with beads ...
You can Knit with Beads

You can use them as Buttons on Dolls' Clothes


Again - beads to fasten a dolly coat

Beads as Bling on a pair of Shoes
Would you like to see more of these projects ? ??  The shoes are for ME the other items are for Blythes - yes those dolls are taking over this blog.

Over the Christmas / New Year season I organised another swap for the Knitting for Blythe group on Ravelry.  My swap recipient (the person whose dolls I was making for) lives in rural France, in Bourgogne which is one of my favourite parts of the world   sigh!     She customises most of her dolls - making them look quite elfin and other-worldly ... so I simply HAD to make fairy / pixie / elfin outfits.

The first evolved into a SnowDrop Fairy costume -  SnowDrop because that's the name of the lace stitch that I used for the top skirt.

There is a built in 'petticoat' layer too.  Two lace-weight yarns with white mohair yarn at the hem; one lace weight I dyed a very pale blue/grey - using 2 shades of white together creates depth.  Both lace-weights held together for the bodice with mirrored glass seed beads knitted in.  My first ever attempt at knitting with beads.
Lillian showing her petticoat

OK - pretty dress but this is a Fairy Costume and you simply cannot have a Fairy Costume without Fairy Wings!   
 
 Complex wee things to make - but rather fun too.  Remind me to do a 'workshop' blog to show you how I made them.
Violetta modeled the wings for me.


The 2nd swap outfit evolved from memories of the forest in Bourgogne in winter 2007 (our 2nd ever overseas holiday).  
Artists and photographers talk about 'the quality of light' - the sunlight.  In France the sunlight has a softness, a hazyness - you can see why it was the birthplace of Impressionism and Pointillism!
 The colours of the forest( forĂȘt) in early December, late afternoon - all chestnut and antique mauve - the light definitely had a purple tint.  This is an outlying bit of the ForĂȘt de Champornot with the river Cure in the foreground.

I tried to reproduce those colours in a dolly outfit.  Again in lace-weight yarn - this time Touch Yarns hand-dyed in lovely soft browns and greys to which I added strands of embroidery thread in antique mauves.   Not quite right but getting there.  
A fitted coat with big 'romantic' sleeves, buttoning down the front with crystal glass beads.  Also made a hood, it is not snug about the face though it isn't quite as flatteringly / romantically loose as I planned.  Still it is cute with the frilly cape collar and pixie point.
I like the thought that although I cannot go and live in rural Bourgogne (Burgundy) at least some things that I've made can be there in my stead.


The last of the Blythe garments I'm going to show off today is a prototype.  Found this faux fur fabric last week - perfect for doll's clothes as the print is tiny and the fur is low pile (short - like a velvet).
As I mentioned in the last post, I'm toying with the idea of opening another Etsy shop - one with clothes & costumes for Blythe dolls.  Hence this prototype coat - the pattern needs some refinement but the idea - Glamour, Mod, MadMen Era - I think it works.

The beads - 2 real tiger-eye beads (nothing but the best for my Blythes!) with a thread loop for fastening under the chin. 

Lillian showing off the lining


I gave the coat orange satin lining - the alternatives, beige or black seemed just too boring.  Also included a special little inside pocket. 


Now for the one non-Blythe project - my Green Shoes.  I dyed these satin Ballerines late last year (see this post).  But what sort of design was I going to put on them?   Started off thinking very "lush & late Victorian"  but I really wanted to use those ultra-long gold bugle beads so a geometric design seemed more apt ...


Trial designs with pins & needles


Then I found myself having a 1980s moment -
Disco? Super Hero crossed with a Cup-Cake ???   I don't know really but I like it!

From past experience I know that shoes look slightly different when your foot is inside them - so I marked out that dramatic diagonal line with pins and inserted foot with care!

Some hours later all beads firmly stitched on and ...
Twinkle Toes!